Pemeliharaan Terjadwal: Playtech pada 2023-11-30 dari 11.00 PM sampai 2024-05-01 12.29 AM (GMT + 7). Selama waktu ini, Playtech permainan tidak akan tersedia. Kami memohon maaf atas ketidaknyamanan yang mungkin ditimbulkan.
Pemeliharaan Terjadwal: PP Virtual Sports pada 2023-10-13 dari 5.00 PM sampai 2024-06-13 6.30 PM (GMT + 7). Selama waktu ini, PP Virtual Sports permainan tidak akan tersedia. Kami memohon maaf atas ketidaknyamanan yang mungkin ditimbulkan.
Pemeliharaan Terjadwal: Pinnacle pada 2023-08-09 dari 12.45 AM sampai 2024-07-01 12.30 AM (GMT + 7). Selama waktu ini, Pinnacle permainan tidak akan tersedia. Kami memohon maaf atas ketidaknyamanan yang mungkin ditimbulkan.
Pemeliharaan Terjadwal: Pinnacle E-Sports pada 2023-08-09 dari 12.45 AM sampai 2024-07-01 12.30 AM (GMT + 7). Selama waktu ini, Pinnacle E-Sports permainan tidak akan tersedia. Kami memohon maaf atas ketidaknyamanan yang mungkin ditimbulkan.
Pemeliharaan Terjadwal: Crowd Play pada 2023-11-30 dari 7.00 AM sampai 2024-06-06 11.30 PM (GMT + 7). Selama waktu ini, Crowd Play permainan tidak akan tersedia. Kami memohon maaf atas ketidaknyamanan yang mungkin ditimbulkan.
Pemeliharaan Terjadwal: IM Esports pada 2024-04-13 dari 12.00 PM sampai 2024-04-22 12.59 PM (GMT + 7). Selama waktu ini, IM Esports permainan tidak akan tersedia. Kami memohon maaf atas ketidaknyamanan yang mungkin ditimbulkan.
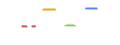
Member memiliki bank di luar yang kami punya seperti MANDIRI, BRI, OVO, DANA, GOPAY dll, bisa transfer ke QRIS TANPA TERKENA BIAYA ADMIN ketika deposit pilih ke METODE PEMBAYARAN E-MONEY